Composing With Sounds : Musique Concrète
all sounds can lead to music
The resources for Composing With Sounds ...
Pianorama
Home | What it's about | Where to begin | Software | Resources | Links | Musique Concrète - History | Contact Us
Resources Home | Water Music | Pianorama | Trainspotting | Voices In The Sky | Miniature Percussion | Studio Hardware Recordings | Glossary | Bibliography
Sonic resources ...
Just an old piano ...
Three sessions with an old piano, doing things your
grandmother would never dream of doing to a piano.
Two messages of
caution here:
-
First - make sure you have the piano owner's permission to do this kind of thing, and make sure they understand what you are going to do!
-
Second - this doesn't work with electronic pianos!
Session 1
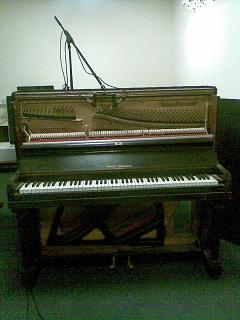 |
The first session was recorded using and old, upright piano that was no longer in regular "playable" condition. The dampers were raised [in the same manner as when the player puts a foot on the "loud" pedal - for some sessions like this, it is useful to work with a friend or partner]. A crossed-pair of small condenser microphones [Behringer C2] was suspended above the action of the instrument, the mics set to point approximately at the upper and lower registers of the strings. the strings were struck, picked, scraped with a variety of items, drom a split piece of cane, a house key, and fingers/fingernails. Drumsticks and drummers' wire brushes also work well for this purpose. Some of the sounds were obtained from "playing" the keys with the piano's action released so that the hammers did not touch the strings. |
-
Key on bass string [if this makes you think of the Tardis, you're thinking along the right lines!]
-
Tentatively ...
-
Going Down ...
-
"Silent" keyboard [Name that tune?]
Session 2
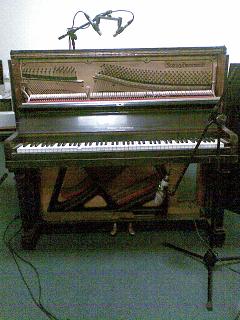 |
Same old piano. This time, as well as raising the crossed pair of small condenser mics, a larger-diaphragm condenser mic [Behringer C1] was suspended under the yeyboard, with the aim of collecting both a little more of the resonance of the bass strings, and of the soundboard behind them. Notice how the bass strings run diagonally from top left to bottom right; it is necessary for these strings to be as long as reasonably possible, within the overall design of the piano. Notice also, with this kind of sample-gathering session in a studio, we can put microphone stands in places that might not always be practical if someone were playing the instrument "normally". Most of my pianist friends would find the boom-arm of that lower stand seriously annoying! Dampers, and instruments for "playing" the strings, much the same as Session 1. Notice the extra "weight" and "body" in some of the sounds, compared to Session 1. |
-
Key on C1 [Key on bass string - now with added 'body'!]
-
Low string thunder [long decay]
Session 3
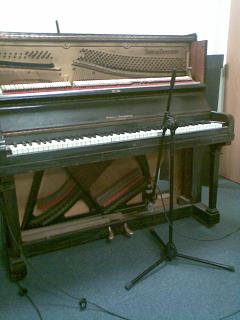 |
Still the same old piano. This time I left the large diaphragom [C1] mic in place at the front of the instrument, but adjusted the stand supporting the two smaller [C2] microphones, so that they were picking-up some of the sound emanating from behind the sound-board, at the rear of the instrument. [Whose daft idea was it to put these instruments with their back to the wall, anyway?] Dampers, and instruments for "playing" the strings, much the same as Session 1. |
 |
A note on the photos: You will notice the
photos on this page, as well as showing quite how much we've accessed the
workings of the piano, also show different microphone positionings.
It might not surprise you to learn that some of these positionings worked
rather better than others! Two pencil mics pointing to the soundboard
at the back was not one of the better ideas; whereas the same pair as
overheads worked very well. The single, larger mic was a better choice
for picking-up the resonances of the soundboard; a larger-diaphragmed model
(like Behringer's B1 or one of the sE 2000 family) would work still better
behind the soundboard; as might a bass/bass drum mic like the AKG D112.
It's sometimes worth experimenting with the type of microphone and
its position, to get exactly the sound you want to start with.
Check back soon; we will have more snippets of sounds, soundbytes and other aural delights for you to download [for free!] take away, and work on ... and a few more examples of what can be done ...